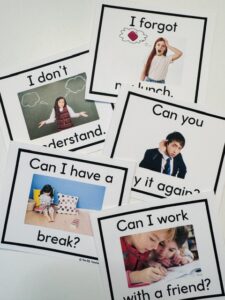
You’ve printed the visual cue cards. And laminated them. You even cut them all apart and put them on a binder ring. And then your newcomer student arrived and you realized, now what?
Visual cue cards are one of the most recommended tools for supporting newcomer ESL students and nonverbal learners. But most resources tell you to print and laminate without ever explaining how to introduce them, how to organize them, how to get students to actually use them, or what to do when a student points to “I miss my family” and you have no idea how to respond.
This post covers all of it. Whether you’re an ESL teacher, a special education teacher, or a general education teacher who just found out you have a newcomer joining your class – here’s exactly how to make visual cue cards work in your classroom.
First: What Are Visual Cue Cards and Why Do They Work?
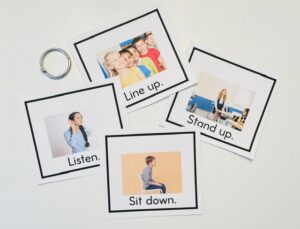
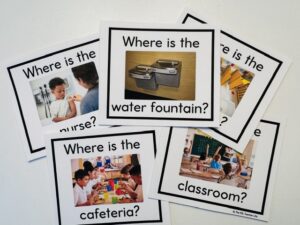
Visual cue cards are simple cards, ideally with real photographs rather than clip art, that show common classroom phrases, directions, feelings, and needs. They have two types: cards for the teacher to communicate TO the student, and cards for the student to communicate back TO the teacher and peers.
These cards work because they remove language as the barrier to communication. A student who arrived from another country last week and speaks no English yet can still point to “I need help” or “I’m scared.” A teacher who doesn’t share a student’s home language can still hold up “line up” or “get your backpack” and be understood immediately.
The key word in all of this is real photos. Real photographs of actual pencils, actual classrooms, actual human expressions, are understood across language backgrounds and proficiency levels immediately and intuitively.
Printing and Prep Tips for Visual Cue Cards
Getting the physical setup right makes everything that follows easier.
Print on cardstock. Regular printer paper works in a pinch but won’t survive daily handling.
Laminate after printing. A laminated card can lasts years. Spend time now to save time later.
Use a paper cutter instead of scissors. When you’re cutting 100+ cards, a paper cutter gives you cleaner edges and saves significant time.
Color code your two sets from the start. Use a red binder ring for teacher cards and a blue binder ring for student cards, or whatever two colors work for you. In a busy teaching moment you don’t want to be sorting through a mixed stack wondering which cards are which.
Hole punch in the upper left corner of each card before placing on the ring. Consistent placement means cards sit neatly and flip easily.
Extra tip: if you need smaller cards, remember you can print more than one page per sheet of paper to make smaller cards. For these, printing 2 pages per sheet works great to add to your lanyard.
Setting Up the Teacher Cards
A few tips for using your teacher cards effectively:
You don’t need to use every card every day. Select the 10-15 cards most relevant to your current week: arrival routine cards, transition cards, the cards you reach for most often – and move the others to a secondary ring until you need them. A lanyard with 100 cards is too much.
Always pair the card with the spoken phrase. Hold up the card AND say the phrase aloud simultaneously. Over time this is how students begin connecting the visual to the spoken English word – it’s incidental vocabulary instruction happening naturally every time you use a card.
Consider posting your most-used teacher cards on a whiteboard for students too see. Students who can see “raise your hand,” “listen,” and “line up” on the wall can begin to self-monitor without waiting for you to hold up the card.
Setting Up the Student Cards
The student card ring belongs with your student – at their desk, in their folder, or on their own small lanyard depending on their age and preference. But before you hand it over, do these two things:
Introduce the cards slowly. Don’t give a newcomer 50+ cards on day one. Start with the basic needs cards and feelings cards in week one – the ones they’re most likely to need immediately. Add more cards gradually as the student settles in and builds trust.
Practice using the cards together before expecting independent use.
Role play it explicitly. Point to “Can you help me?” yourself and show what you do when a student uses that card: you walk over, you smile, you crouch down, you help. Point to ” Can I go get water?” and walk the student through what happens next: they show you the card, you nod, they go to the water fountain.
Students need to know that using the card produces a reliable, kind, predictable response. Once they trust that, they’ll use the cards freely.
The First Week: Go Slow to Go Fast
The temptation in the first week is to introduce everything at once. Don’t do it!
Day one: Introduce just the yes/no cards and two or three basic needs cards. That’s it. Practice them together. Make sure the student understands what happens when they use each one.
Days two and three: Add the feelings cards. Spend time on these – go through each one together, make the facial expression yourself, invite the student to mirror it. This is relationship building disguised as vocabulary instruction.
End of week one: Add more cards gradually as you notice what the student needs. By the end of the first week they should have a working set of 15-20 cards they feel confident using.
Make it feel normal, not clinical. The way you introduce these cards sets the tone for how the student feels about using them. A warm, matter-of-fact introduction: “This is how we talk to each other while you’re learning English. It’s like having a superpower.” works infinitely better than a formal, procedural one.
Tips for Other Adults in the Building
Here’s something that often gets overlooked: your newcomer or nonverbal student doesn’t spend all day with you.
They go to the cafeteria. Perhaps they visit the school nurse. Then they go to PE and music and art. And in every one of those settings, they may need to communicate something – and the adult in the room may have no idea how to support them.
Make copies of your most critical cards and distribute them to:
- Substitute teachers (attach a note explaining the system)
- The school nurse
- The main office
- Specials teachers – PE, art, music, library
- The cafeteria if possible
The note attached to each copy doesn’t need to be long. Something like: “This student is learning English and may point to these cards to communicate. Please respond warmly and directly to what the card shows. Thank you!”
What to Do When a Student Points to a Feelings Card
This section deserves its own space because it’s where most teachers feel uncertain – and where the cards do their most important work.
When a student points to “I’m scared” or “I’m confused” or especially “I miss my family,” the instinct is sometimes to move on quickly, to redirect, to get back to the lesson.
Don’t. Pause. Acknowledge. Make eye contact. A nod, a warm smile – sometimes that’s enough. Sometimes it opens a bigger conversation with the help of a phone translation app or a bilingual colleague. Either way, you’ve communicated something that no visual card can say on its own: I see you, and your feelings matter here.
For newcomer students especially – many of whom have left behind everything and everyone familiar to them – being seen in that moment is not a distraction from learning. It IS the learning environment that makes everything else possible.
As the Year Progresses: Fading the Cards
The goal of visual cue cards is never permanent dependence on them. The goal is communication – and eventually, independent communication in English.
Watch for the moments when a student says a phrase out loud instead of pointing to the card. Celebrate those moments.
Gradually encourage verbal responses alongside the card: when a student points to “I need help,” gently model saying it aloud and invite them to try. Never force it. Instead, create the invitation consistently.
As a student’s spoken English grows, the cards naturally become less necessary. Some students stop using them within a few months. Others use them for a full year or more depending on their proficiency level and personality. Follow the student’s lead.
Done for You Visual Cue Cards
If you’re looking for a ready-to-use set of real photo visual cue cards with both teacher and student sets included – covering classroom directions, basic needs, feelings, social interaction, safety, and self-advocacy – you can find 100+ cards in my TPT store here.